
Microservice Dev Environments
Scene
At a boundary between early morning and a late evening in February, two things were rapidly becoming shorter in my world: the days and Q1 project deadlines. To meet one of these deadlines I asked the survey team to create two new services. This was being done to provide a more scalable system to one of the fastest-growing business lines in the Numerator portfolio. The services of note are a React UI and a backend API for creating surveys. Each of the services got their own git repo and their own development environment. This was where things started to fall apart a bit as communication between the two services is up to the developer to manage...
Manageable sure, via good documentation, but, the reality is there are more services and more engineers to come. And, the question that has caused me many sleepless nights across my career creeps into my mind again...How on earth is this going to scale? It was a bit different this time as I wasn't concerned with how the production environment was going to scale, but rather the development environment.
And, here's where the fun starts...
The importance of a good development environment can not be overstated. What does good mean? I think it means the following:
- Easy to bring up. Three commands or less is ideal. The simpler an environment is to bring up, the faster the work that matters can be done.
- Accessible to other teams. Can other teams easily bring up the environment to test integration features?
- Ability to develop offline. Being able to code from anywhere is important. Who doesn't love writing code on a redeye where <insert airline here> provides you with yet another voucher because the internet doesn't work?
Taking a look at my list here and going back to that night (or morning) in February. I realized rather quickly that the development environment that the team and I were working on was not going to cut it.
The Problems
- Multiple repositories with separate Dockerfiles and separate docker-compose setups. Each could be run individually with ease (Makefiles), but communicating between the services was eventually going to be a problem. At this point to bring up the UI and the backend API, it was four steps. Each additional service was going to add another two steps. Rule number one broken.
- This wasn't going to be easy for other teams to access. They would have to know exactly what service they needed to communicate with. What if they needed two, three, or more of them? It would quickly become tough to manage. We want other teams to be able to easily access these services. We needed to make them accessible. Rule number three broken.
The ability to develop offline was the only criterion we were meeting. Some rules are meant to be broken, but unless we are hitting a baseball or shooting three-pointers, "one out of three ain't good".
The Options
As with most problems in software engineering, there are multiple ways to crack an egg. What were some things that crossed my mind?
- Keep the current structure. Document well. Throw scaling to the wind and leave it as is. If this were our approach we would not be discussing this right now.
Next. - Move everything to one repo. This thought briefly crossed my mind. With all the code and Dockerfiles available it would be easy to bring up all the environments with ease. However, we lose all the benefits of being in separate repos; ease of deployments, code reviews, separated ownership, etc.
Next. - A centralized shell script. The script would pull all the necessary repos in. Run the Dockerfiles and set them up in a single network. The script would have to in a separate repo or be distributed in an easy to access fashion. Getting closer here, but still not ideal.
Next.
The Solution
I decided to create a main repo that would hold all of the microservices as git submodules. This main repo would provide a docker-compose that relies on the submodules Dockerfiles. Meaning that anytime we wanted to add a microservice we would just need to add a Dockerfile in the new service's repo, and reference the new Dockerfile in the main repos docker-compose. With this and a Makefile in place, an end-user could easily bring up the entire environment with one command. The details might be a bit foggy at this point, but we'll get to those shortly.
The other added benefit that this solution gives us is that it still allows us to easily test each microservice in isolation.
Let's go.
The Tech
Docker- Our services are light-weight and will be deployed as containers. Docker was an easy choice to make here.docker-compose- There was a debate between compose and Vagrant for networking. I ended up going with docker-compose but didn't have strong feelings one way or the othergit submodules- I cringed at first as I went down this path. I hadn't used git submodules in several years and the last time I did it was a bit of a nightmare. But, there's been a fair amount of improvements and this turned out to be the right tool for the job.nginx- For that sweet reverse-proxy to make remembering ports a thing of the past.
The Structure
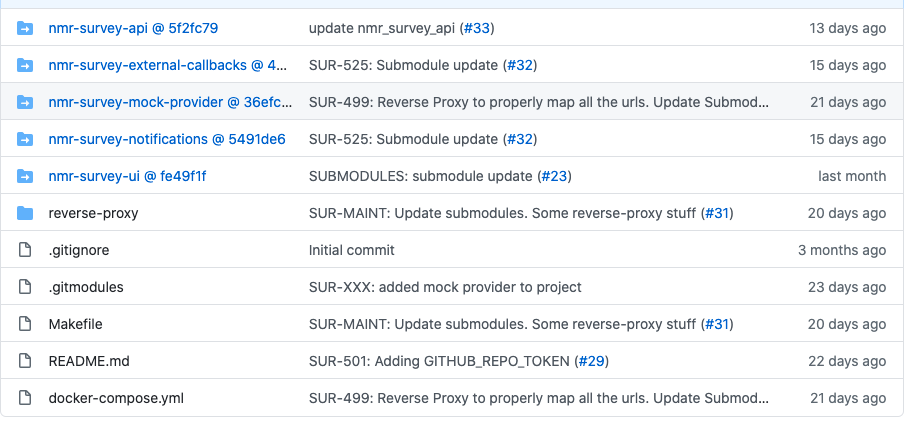
This is what we (the survey team) have living in production as of today. There are four backend services and just the one frontend. The directory structure is shown in the following image:
The Microservices
I'm going to get back to the development environment shortly, however, I think we need a bit of an explanation on why we ended up with four backend microservices and a UI. We made the decision that we wanted each microservice dedicated to either a single data-model or a small-series of data-models. This along with the separation of their data storage layers would allow us to scale each service seamlessly. The definition expanded a bit into a service being responsible for a single action or a series of actions. When all was said and done the separation ended up being like this:
nmr-survey-api - This service would handle the creation of survey objects and survey response objects. We debated separating responses off into its own service but kept them together for simplicity. Surveys are run through a third-party provider (Qualtrics, SurveyGizmo, SurveyMonkey, etc.) and the objects hold information about how to access and issue those surveys. An end-user could run the same survey many times and the user's response(s) would be stored in a response object. This is where the argument comes in that the response objects should be separated into their own service away from the survey objects; since the former is going to receive way more traffic than the latter. We punted this problem to the future.
nmr-survey-notifications - This service would handle the creation and grabbing of a notification. A notification in this context is an object that would notify a survey respondent if they have a survey to take. These objects could eventually serve other purposes, but for now, that is their job. This service is exposed through another service the survey team doesn't manage that gives access to our client-facing applications. That client-facing application sees a ton of traffic, which in turn means this service will see a ton of traffic. We needed this service to be able to scale independently of other services in the stack.
nmr-survey-external-callbacks - This service is exposed publicly and is not behind an auth layer. It receives calls from the external providers whenever a respondent completes a survey. The service is simple in the fact that it doesn't require a data store and by design can be open to the public.
nmr-survey-mock-provider - This is an internal-only service that is used locally and in our staging environments. It simulates responses coming into our system from the third-party survey providers. This makes testing internally much easier as we don't have to issue surveys in order to see survey responses in real-time.
nmr-survey-ui- The UI layer, a React application that is hosted statically via AWS CloudFront in staging and production. This is an internal-only application and is used by our Research Managers to issue and view surveys. Authentication is provided through our internal SSO using: AzureAD, aws-amplify, and Cognito.
The Architecture
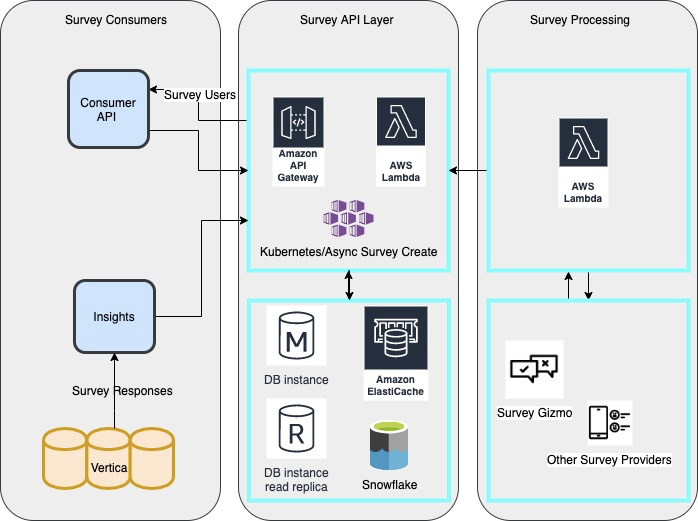
The Initial Vision
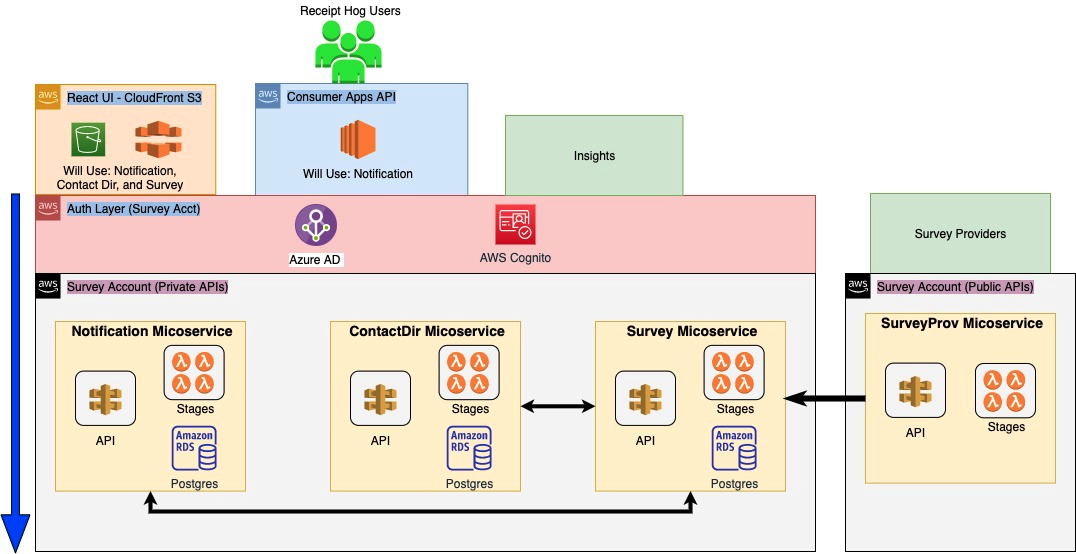
The "Final" Product
The diagram here has an additional service in it that was not mentioned in our earlier explanation. The ContactDir Miroservice is a service planned on our roadmap that will handle pulling potential survey respondents for surveys.
There is also an Auth Layer here that isn't mentioned above. This is another microservice, but it's a codeless service as we use AWS Cognito to store and authenticate our users.
Implementation Details
With the overall context and goal in mind, I'm going to go back to the initial photo of the directory structure; the directories nmr-survey-api, nmr-survey-external-callbacks, nmr-survey-mock-provider, nmr-survey-ui, and nmr-survey-notifications are all pointing to a different git repo. These represent our services and they are all git submodules. For more information on submodules and their setup, this GIST is really helpful.
All of the submodules mentioned above need to talk to each other. This is accomplished through docker-compose, and the following example will show what that should look like.
In this example, we will cut the microservices down to the UI and the API for the sake of simplicity. The rest of the services are similar and this should give a good idea of the pattern.
I will start with the orchestration and networking. This will be handled via docker-compose. The code is as follows:
docker-compose.yaml
version: '3.6'

services:
   api:
    build:
      context: ./nmr-survey-api
      dockerfile: Dockerfile
    entrypoint: "scripts/docker-entrypoint.sh"
    depends_on:
      - db
    environment:
      STAGE: docker
    volumes:
      - ./nmr-survey-api/:/var/www/numerator/nmr-survey:cached
    ports:
      - "8005:8000"
    stdin_open: true
    tty: true

   ui:
    build:
       context: ./nmr-survey-ui
       dockerfile: Dockerfile
    ports:
      - "3000:3000"
    volumes:
      - ./nmr-survey-ui/:/usr/src/app:cached
      - node_modules:/usr/src/app/node_modules:cached
    stdin_open: true
    tty: true
    entrypoint: "scripts/docker-entrypoint.sh"

   db:
    image: postgres:11
    environment:
      POSTGRES_USER: postgres
      POSTGRES_PASSWORD: postgres
      POSTGRES_DB: survey
      PGDATA: /data/postgres
    volumes:
      - ./nmr-survey-api/sa.db:/data/postgres:cached
    ports:
      - "9998:5432"
    restart: unless-stopped
What all is going on here.
- The Services - There are three defined services. The API to gather and create surveys, the UI for presentation, and the DB to store information that the API creates.
- The Network -
docker-composeprovides a default network and that is what is being used above. All the services defined in the file live on the same default network. Meaning they can all talk to each other, for example, if the api needed to access the database, it could just usedbfor the hostname. - Building the services - There is a build context defined. This indicates to
docker-composewhere theDockerfilethat defines the service is located. - Running the services - Each of the services also defines an entrypoint. An entrypoint can do a variety of things, but in our case, it starts the development servers.
- The ports - Exposes the running Survey API, UI, and DB ports to the host machine.
Digging In
Going in a little deeper, what do these files do and where do they live?
API Entrypoint (nmr-survey-api/scripts/docker-entrypoint.sh)
This entrypoint lives inside the nmr-survey-apisubmodule. It does a DB migration and utilizes Django's runserver to fire up the API.
#!/usr/bin/env bash
# Set strict mode options
set -euo pipefail

echo "Migrating"
python -m pip install -U pip
pip install -c requirements.txt .
python manage.py migrate
python manage.py collectstatic --no-input

echo "Starting Django server"
python manage.py runserver 0.0.0.0:8000
UI Entrypoint (nmr-survey-ui/scripts/docker-entrypoint.sh )
This entrypoint lives inside the nmr-survey-uisubmodule. It ends up being a one-liner since the UI utilizes webpack and can quickly be brought up via a yarn command.
yarn startAPI Dockerfile (nmr-survey-api/Dockerfile)
FROM python:3.8-slim

ENV PIP_DISABLE_PIP_VERSION_CHECK 1

WORKDIR /var/www/numerator/nmr-survey

RUN apt-get update
RUN apt-get install -y \
        git \
        libpoppler-cpp-dev \
        poppler-utils \
        postgresql-client \
        unixodbc-dev
RUN apt-get clean

ADD requirements.txt /tmp/requirements.txt
RUN pip install --no-cache-dir -r /tmp/requirements.txt

ADD requirements.dev.txt /tmp/requirements.dev.txt
RUN pip install --no-cache-dir -r /tmp/requirements.dev.txt

RUN rm /tmp/requirements.txt
RUN rm /tmp/requirements.dev.txt

EXPOSE 8000
EXPOSE 9998
UI Dockerfile (nmr-survey-ui/Dockerfile)
FROM node:13.10.1-buster-slim

RUN apt-get update \
    && apt-get install -y \
        curl \
    && rm -rf /var/lib/apt/lists/*

# Grab pinned version of yarn
RUN curl -o- -L https://yarnpkg.com/install.sh | bash -s -- --version 1.22.4

# create a place for the app to live on container
RUN mkdir -p /usr/src/app

WORKDIR /usr/src/app
COPY ./package.json ./
COPY ./yarn.* ./
RUN yarn install

ENV PATH /usr/src/app/node_modules/.bin:$PATH

EXPOSE 3000
WORKDIR /usr/src/app
The Final Piece
What helps us have a README as simple as this?
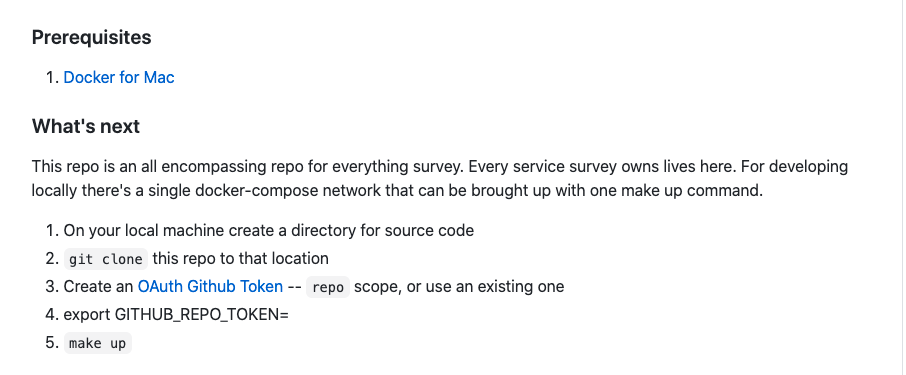
The Makefile does a lot of the work for us. We chose to use make here for the following reasons:
- Available without an external library install on most development setups
- The commands we were wrapping were in most cases simple one or two-liners
Makefile
As shown below we have added a fair amount of convenience functions. Here's the code:
help: ## this help
	@echo "Makefile for managing application:\n"
	@grep -E '^[a-zA-Z_-]+:.*?## .*$$' $(MAKEFILE_LIST) | sort | awk 'BEGIN {FS = ":.*?## "}; {printf "\033[36m%-30s\033[0m %s\n", $$1, $$2}'

# Init Repo
init: ## init submodules
	git checkout master
	git pull
	git submodule update --init --recursive

update: ## update submodules
	git submodule update --init --recursive

# Docker Compose
clean: ## shut it down
	docker-compose down -v

build:  ## rebuild docker images
	docker-compose build

up:  ## start local dev environment; run migrations
	docker-compose up -d

shell-api:  ## exec into bash shell
	docker-compose exec api bash

shell-ui:  ## exec into bash shell
	docker-compose exec ui bash

attach-api: ## attach to process for debugging purposes
	docker attach `docker-compose ps -q api`

attach-ui: ## attach to process for debugging purposes
	docker attach `docker-compose ps -q ui`

logs: ## view logs
	docker-compose logs -f

reinstall-ui: ## reinstall dependencies on frontend
	docker-compose exec app yarn install

# Tox Tests
test-backend: ## run backend-tests and generate coverage
	docker-compose exec api tox -e coverage

lint-backend: ## run linters
	docker-compose exec api tox -e pylint

test-frontend: ## run frontend tests
	echo 'TODO' >> /dev/null

# Django Stuff

makemigrations: ## make migrations on the docker container
	docker-compose exec api python manage.py makemigrations

migrate: ## migrate database
	docker-compose exec api python manage.py migrate


# Simple Database Access

db: ## access the DB from the command line
	docker-compose exec api psql -hdb -p5432 --user=postgres
The Rest of It
There was a lot said above, but also a lot left unsaid. Tying all the pieces together above really allowed the survey team to move fast. For the next blog post, I'll dive in deeper technically on the Authentication layer! Hope the content was enjoyable and, as a last note Numerator is HIRING!